


Time for a Fabric Pull!
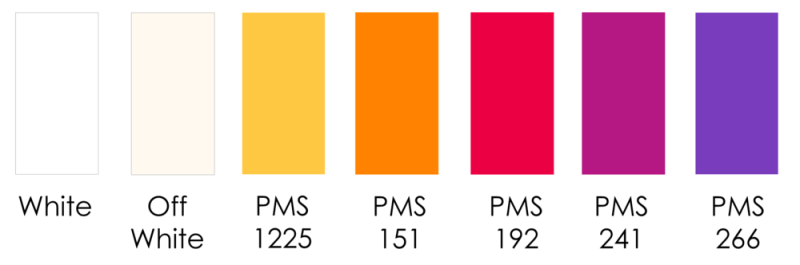
At this month’s meeting we will be finding out more about the prep for this year’s QuiltCon 2018 Charity Quilt – remember, the theme this year is modern traditionalism – something I think our group really excels at! The Charity Quilt committee has asked that we pull tone on tone fabrics from our personal stashes in this year’s colors – remember, solids and prints are both ok, but the prints cannot contain colors outside of the palette below. Scraps? We got this. 🙂
Manchester Quilting Bee Info

Hey all! Our tried and true charity chairwoman, Eileen, will be collecting hexagon blocks for the Manchester Quilting Bee effort. We would love to see everyone contribute at least one if you can find the time! Here are the details (and here’s a link to all their info on facebook: Manchester Quilting Bee). A very brief summary: Use the templates linked below to create a 5″ hexie that can stand up to washing, then applique it onto a 6.5″ fabric square – please don’t trim the fabric underneath the hexie, as they’d like to keep it for stability. If you are making several, feel free to piece them together. Eileen will be collecting and mailing, or you can mail directly to Chris in Jersey City – just make sure to mail so they arrive before June 11th! But first a little background info: Why hexies? Why bees? In the 1800s Manchester was awash with textile mills that were commonly described as ‘hives of activity’ and the workers inside them compared to bees. It has been a symbol of the city ever since – I’ve included some images of bee artwork found in and around Manchester as inspiration below. Embroidery and piecing are welcomed as part of your hexagon design.


“This project is already growing far larger and quicker than we ever imagined – thanks so much for wanting to be involved.
Realising that we’re probably going to receive a large number of hexies, we’ve decided to save time in piecing them by asking you to applique them onto squares of fabric (instructions below). If you’d prefer to send just the hexies that’s fine too but you’ll appreciate that it’ll be easier for us to work with squares and to adapt any discrepancies in size ![]() 😀
😀
Block Instructions:
Size: to create a 5″ hexie – you can use the google doc or dropbox template provided in the links below – please unclick ‘fit to page’ and print out at actual size or 100%. Alternatively, the length of each hexie side is 2-7/8″ and the distance across the block is: flat side to a flat side 5″; point to point 5-3/4″. The unfinished block is 5″ and there is a 1/4″ seam so the workable, finished block is 4-1/2″.
Template Links:
https://www.dropbox.com/s/zm7i73qt7pe…/quilt%20template.pdf…
https://drive.google.com/…/0B4cKopbPENr1TzR3WUlRWEM4T…/view…
Fabric + Embellishment: please use any colour of quilting weight cotton to make your blocks. Blocks can be left blank or embroidered, appliqued or decorated in any way, but must be able to survive a wash, and any beading or raised decoration should be away from the 1/4″ seam.
Papers: if you use a paper template to create your hexie and don’t wish to applique it to a fabric square (see below) we don’t mind whether you remove or leave the paper in place when mailing. For ease, we’ll be quilting most of these hexies directly onto a larger fabric but some may still be joined using the EPP method, we’re happy to receive with or without paper ![]() 😀
😀
INSTRUCTION UPDATE
Applique: in an update to our original instructions we would love you to machine or hand raw-edge or turn-edge applique the hexies onto 6-1/2″ fabric squares (please remove papers before appliquing). When complete, don’t trim away fabric from behind the hexie as the square fabric will help stabilise the block. If you make more than one block feel free to join them together. We’re trying to make the piecing process faster now it seems like there will be a larger response than initially envisaged and this will allow us to machine piece the blocks easily. Note: if you have already made your hexies, as in the original instructions posted, you are still welcome to send them in as hexies. However, given the scale things have grown to, it will be helpful, but not essential, if you can applique them to squares ![]() 😀
😀
Deadline: we now have a deadline for receiving blocks – Monday, 11 June 2017.
UK mailing address:
Michelle Burridge
c/o Manchester Quilting Bee
25 Stretford Road,
Urmston,
Manchester
M41 9JY
ENGLAND
US mailing address – ONLY AVAILABLE UP TO 11 JUNE 2017
(please don’t send items to arrive after 11 June as Chris is travelling to Britain to deliver the items that week and then moving home. Items arriving after that date may not arrive/be lost so, please send late items to the UK address only)
Chris Dodsley @made by ChrissieD
c/o Manchester Quilting Bee
110 River Drive #2307
Jersey City
NJ 07310
USA
Canada mailing address:
Amanda Elias @Atelier Fiber Arts
c/o Manchester Quilting Bee
3993 rue Wellington,
Verdun, Quebec, Canada
H4G 1V6
Getting Involved
If there are any quilting groups who could get involved it would be hugely appreciated!
Piecing Parties
We’ll be updating the page with news of piecing parties once the blocks have arrived.
Donations
We’d love backing + binding fabric and batting/wadding donations along with offers for long arm/machine quilting services. Please private message us ![]() 😀
😀
If there are any questions, don’t hesitate to message! We’re completely new to all of this and a bit overwhelmed by the response so far! ![]() 😀 ”
😀 ”
Fundraising Mini Quilt Auctions begin this weekend on Instagram!
I’ve included the info on our mini quilt auctions below – please share widely! Feel free to re-post on your instagram and facebook accounts – let’s all work to spread the word!
We are going to be kicking off our mini quilt fundraising auction on IG tomorrow at 10 am….which mini will it be??? Check back tomorrow to find out! Rules: All quilts will have a starting bid of $25. Each auction will run for 48 hours. Must include PayPal address with your bid. Please tag the previous bidder in your comment! Minis will be sent flat rate priority mail within the US – international winners, please pm us with your shipping method of choice. Shipping not included in bid. Auction quilts must be paid for within three days of auction end. Thank you for your support!
Summer Sewing with Freshly Pieced

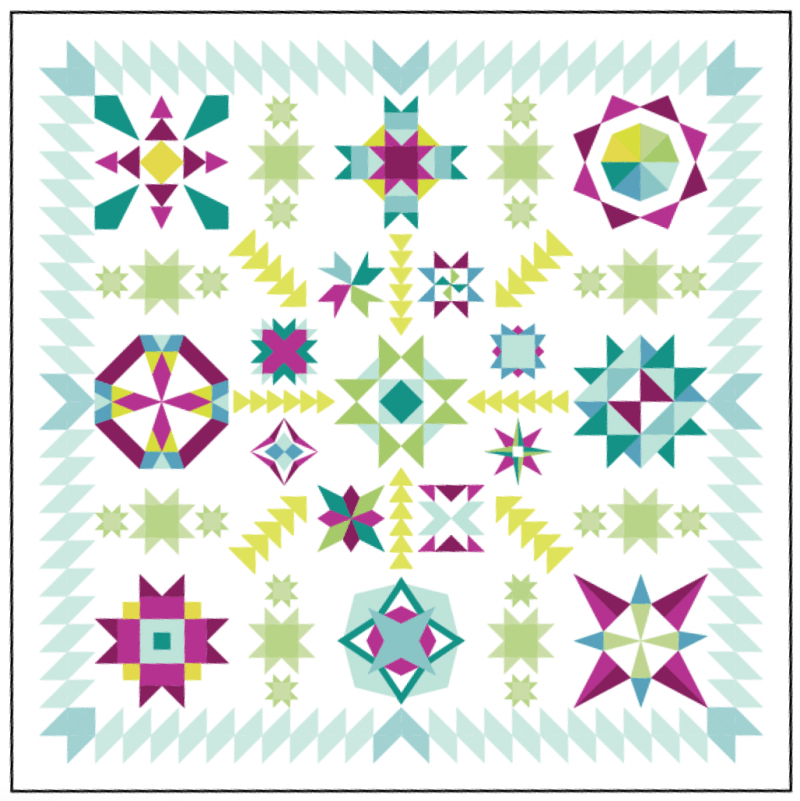
Several members of our guild are participating in Lee Heinrich’s 2017 Summer Sampler: Summer Star Medallion quiltalong this year. It is a block of the week program with both traditional and paper pieced blocks running through September 4th. It just started May 15th, so plenty of time to catch up if you would like to sew along with us! You can find the details on Lee’s blog post here. The final product will be 17 blocks, with assembly instructions and “filler block” directions sent out in September to finish off your quilt. I’ll be updating our album here as JSMQG members dive into this fun summer project. Make sure to tag your instagram photos with #summersampler2017 and #jsmqg to play along!
JSMQG May Meeting
We had a great meeting this month, with lots of new faces! We agreed that we are all interested in creating a charity quild quilt for Quiltcon 2018, and will explore our ideas next month on how to proceed. Remeber, the theme is “Modern Traditionalism”!
After a great show and tell, an amazing door prize donated by June, and a run through of our latest fabric donations, we discussed our upcoming June pool party/meeting, where Michelle will be running our first “ugly fabric” auction – as she reminded us, bring cash ladies! 🙂
Brandy gave a wonderful presentation for our “Back to Basics” series, on pressing our half square triangles and making design decisions as we move forward with the layout our final designs.
Sherre has been BUSY – she brought in many new quilts, everything from shop samples to her just completed Farmers Wife quilt for her bedroom!
Love the colors and quilting on this one!

Great quilting on this graphic jelly roll race quilt

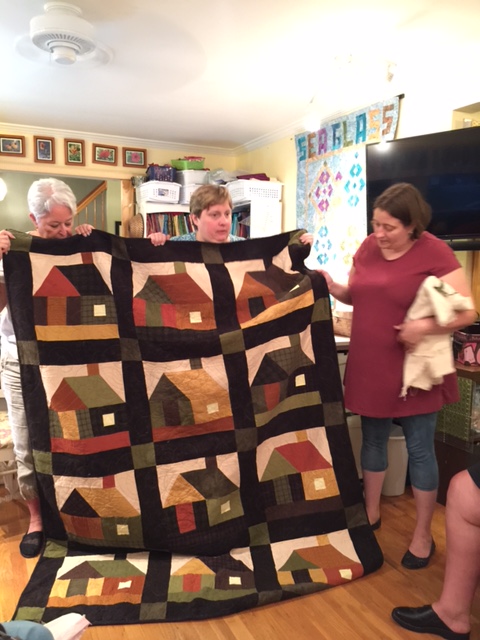
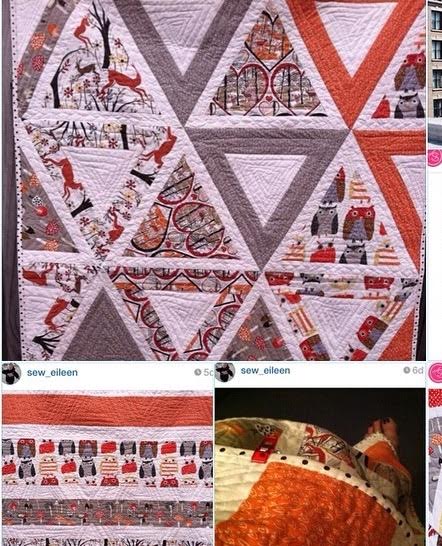
This charity quilt has the most darling camping and outdoor scenes, alongside beautiful quilting.

Here is Sherre’s completed Farmer’s Wife Quilt – stunning! Check out the details she added to the corners! She is amking shams and accent pillows too!

Here is Sherre’s beautiful Farmer’s Wife Quilt – it is destined for her bedroom, along with matching pillowcases and shams. And look at the border designs she added – love it. I think I need to dig out my book and start these up again!

This ombre shop sample by Sherre was stunning, front and back!

This ombre shop sample by Sherre is just stunning – front and back. Check out all those thread changes!


Next up were two great quilts from Diane, first this uplifiting pink/purple and neutrals quilt, with wonderful dark thread quilting on top, and just as perfect pink thread on the back.

Patti claims this is her “first” modern quilt – pretty great first creation! Love the patterns she created in this quilt.

A great modern top from Kat – YES, batiks can be modern!
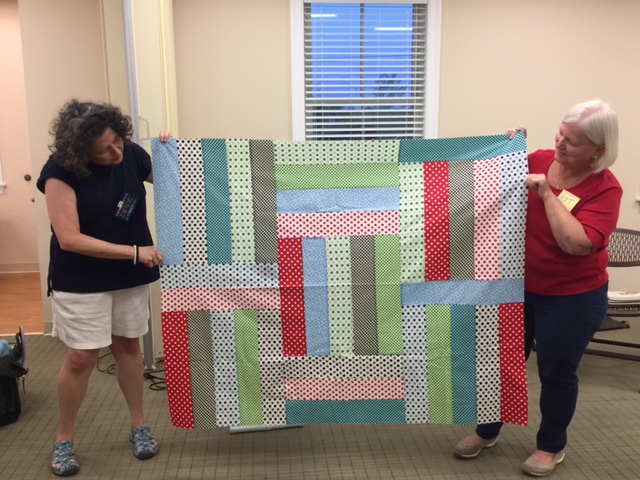
Can’t wait to see this cute polka dot number all quilted up!
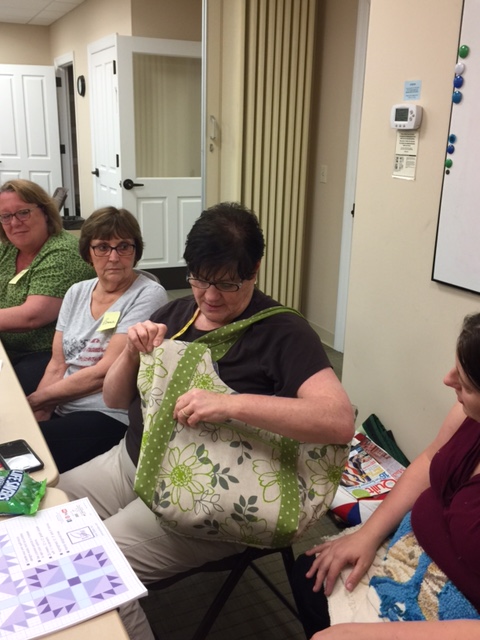
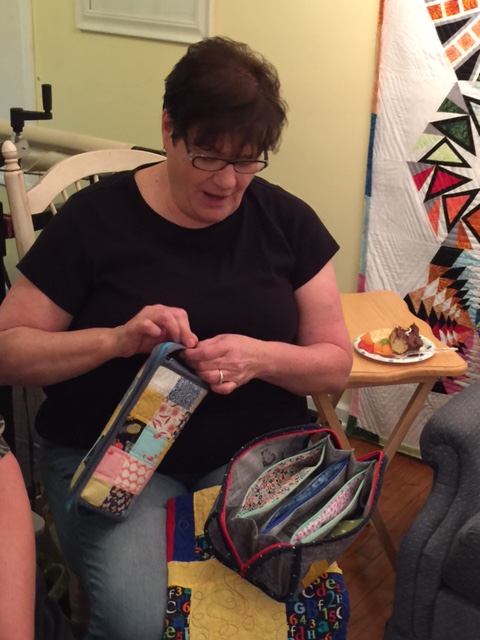
Eileen finally made one of her amazing bags for herself! This one is a pool tote based on a pattern from Noodlehead Designs. Diane left us with some great half square triangle inspiration to finish off our show and tell!


JSMQG Making a Difference!
 Here’s a wonderful letter we received re: the charity quilt we donated to Friends of MCCAC for their charity auction…keep up the good work ladies!
“Dear Eileen,
On behalf of the Friends of the Monmouth County Child Advocacy Center, I would like to express our thanks to you and the Jersey Shore Modern Quilt Guild, for the magnificent quilt you created and donated to the Monmouth County Child Advocacy Center. The quilt was the focal point of the silent auction at our recent “Wine Sipping, Sampling and Savoring Event” fundraiser, held at Grape Beginnings in Eatontown. Our winner was truly thrilled with her work of art and the funds donated from the quilt will be used to purchase medical equipment for the new Medical Suite in the Phase II building. The evening was a wonderful success and enjoyed by all!
The Friends of MCCAC is committed to doing all we can to raise money to insure the support of Phase II for the Child Advocacy Center. We continue to make progress towards building an advocacy center that is a safe, child-friendly facility where the victims of child abuse, neglect and assault can go to access the necessary prosecution, law enforcement, child protective services, medical, mental health and advocacy services following a report. We can’t do this alone; the support of generous people like you makes our efforts possible.
Again, we thank you and appreciate you and the Jersey Shore Modern Quilt Guild, as true “friends” of the Friends of the Monmouth County Child Advocacy Center.
Sincerely,
Angela Juffey
Chair/Treasurer
Friends of the Mo”
“
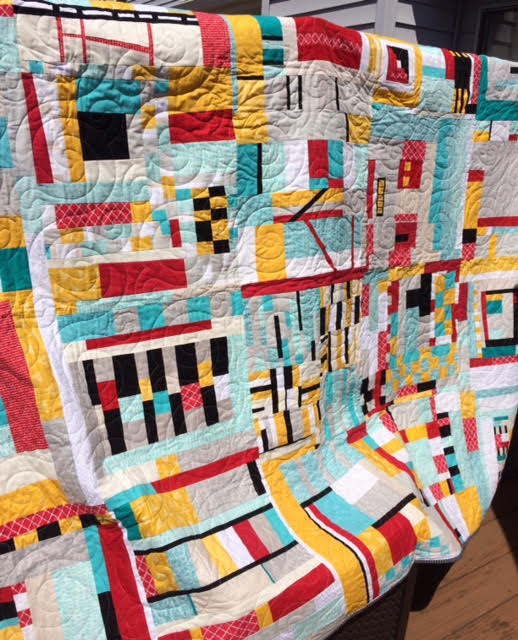
Racers, start your engines!

The guidelines and color palette for the Quiltcon 2018 Charity Quilt competition are out! Quilts must be constructed from the color pallete above, but do not need to include every color in the palette. Coordinating prints can be used in the design as long as they don’t contain any colors outside of the pallete above. As usual, quilts should be twin size – minimum 65” x 88”, no larger then 72” x 92”.
The theme this year is “Modern Traditionalism”…this immediately made me think we could put some of our “Back to Basics” Half Square Triangle Skills to the test. 🙂 I can’t wait to hear everyone else’s ideas at the our next meeting!
Charity Report from the trenches!
An update from our amazing Charity chairperson, Eileen – keep up the good work ladies!
Since September of last year, this guild has done some really awesome things in the name of charity. First the placemat donation to Lunch Break, quickly followed by the twenty two quilts we donated to the residents of the HABcore boarding home, both in Red Bank, NJ.
Last month it was the thirteen children’s quilts to the Valerie Center at Monmouth Medical in Long Branch, NJ. Awesome!!
Our latest donation is our Quiltcon 2015 charity quilt submission. I initially reached out to the Monmouth County Child Advocacy Center in hopes of donating quilts for the children there. The Advocacy Center is run by the Monmouth County Prosecutors Office for children who are the victims of sexual assault, abuse, and neglect. I was told that they are unable to give the children gifts of any kind as they could be misconstrued as a gift in exchange for testimony in court hearings. It’s a shame that the world has become so skeptical even when it comes to an act of good deed, but in the end those quilts went to the Valerie Center and I had the good fortune of meeting Lynn Reich of the Friends of the Advocacy Center.
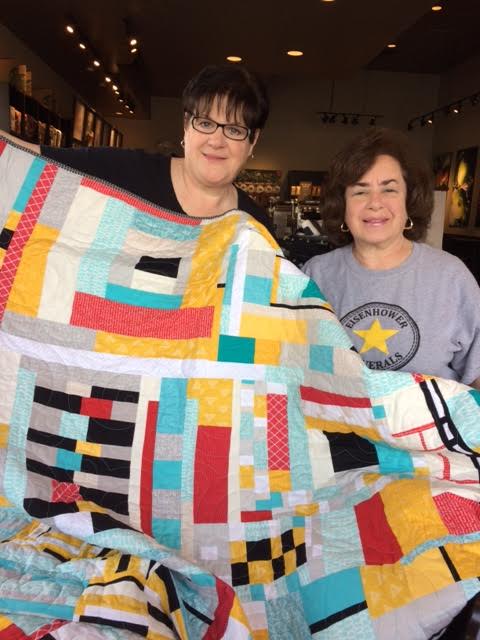
Lynn accepted our Quiltcon charity quilt to be auctioned off at their fundraising event at Grape Beginnings in Eatontown, NJ on April 22nd. We met at Starbucks and it felt like meeting an old friend. What was supposed to be a quick handoff turned into the better part of an hour. We enlisted a stranger to take this photo of us.
I sincerely hope they can raise some money with this quilt. You can read about the event on their website www.friendsofmccac.org
We may have shrunk in size, in terms of membership, but certainly not in heart! I look forward to the chance to continue to serve our community and another charitable year for the guild. Thank you to everyone for making all of this possible. Eileen
April Sew In!
We had a great sew-in this month! Nat whipped up two gorgeous matching Easter outfits for her twins…
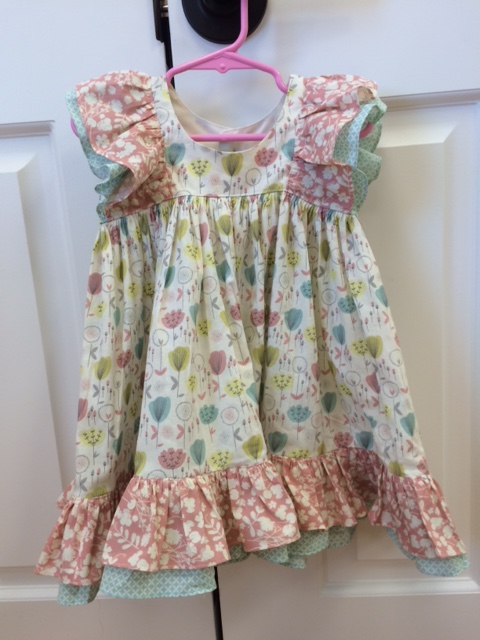
This is the Clara Dress pattern from Violette Field Threads – beautiful!
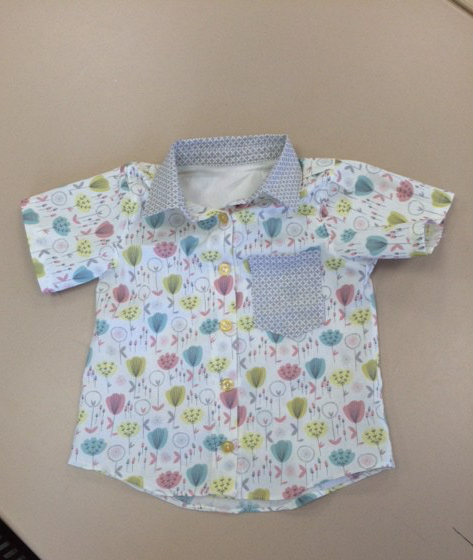
And this adorable Classic Oxford is from Peekaboo Pattern Shop – so cute!
Brandy worked on her blue and green quilt, and got some binding assistance from Deb L

And Deb L was busy on a blue and green quilt of her own!

Who doesn’t love a baby quilt?
We love making baby quilts here at JSMQG! Here’s a round-up of a few of our favorites!
In 2015 I made this clamshell quilt for a little guy who is turning two soon…
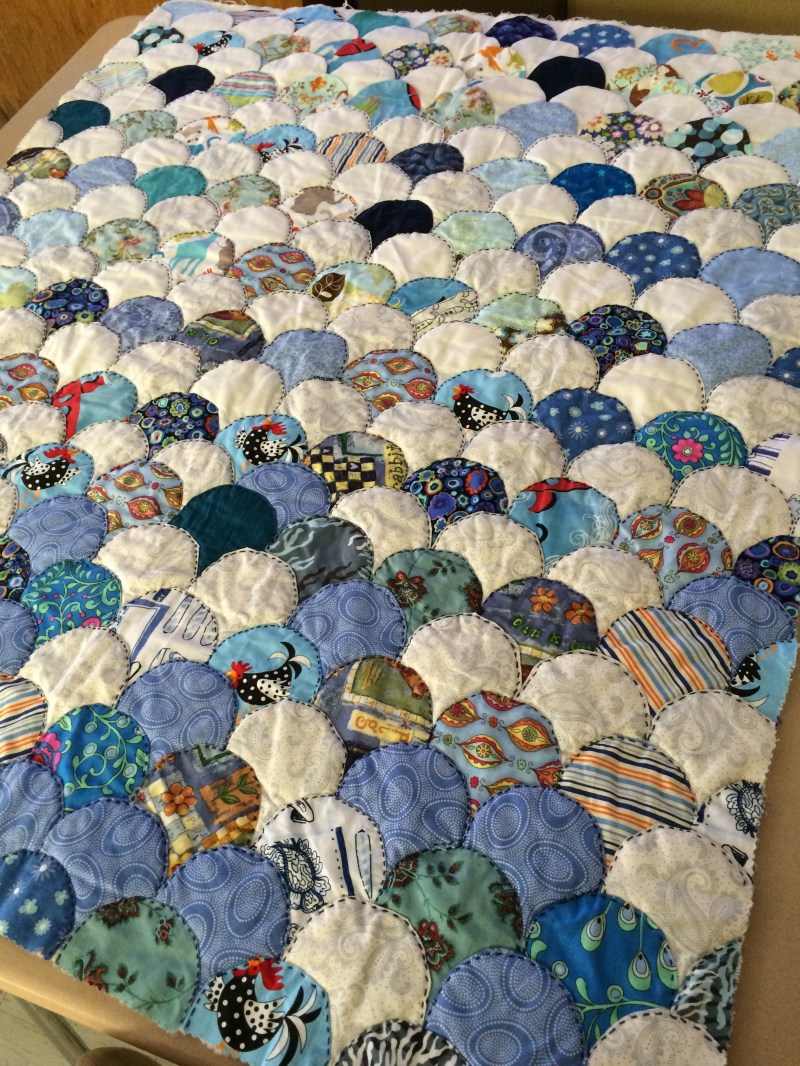
And last week presented this one to his mama for his new little sister! – Shannon
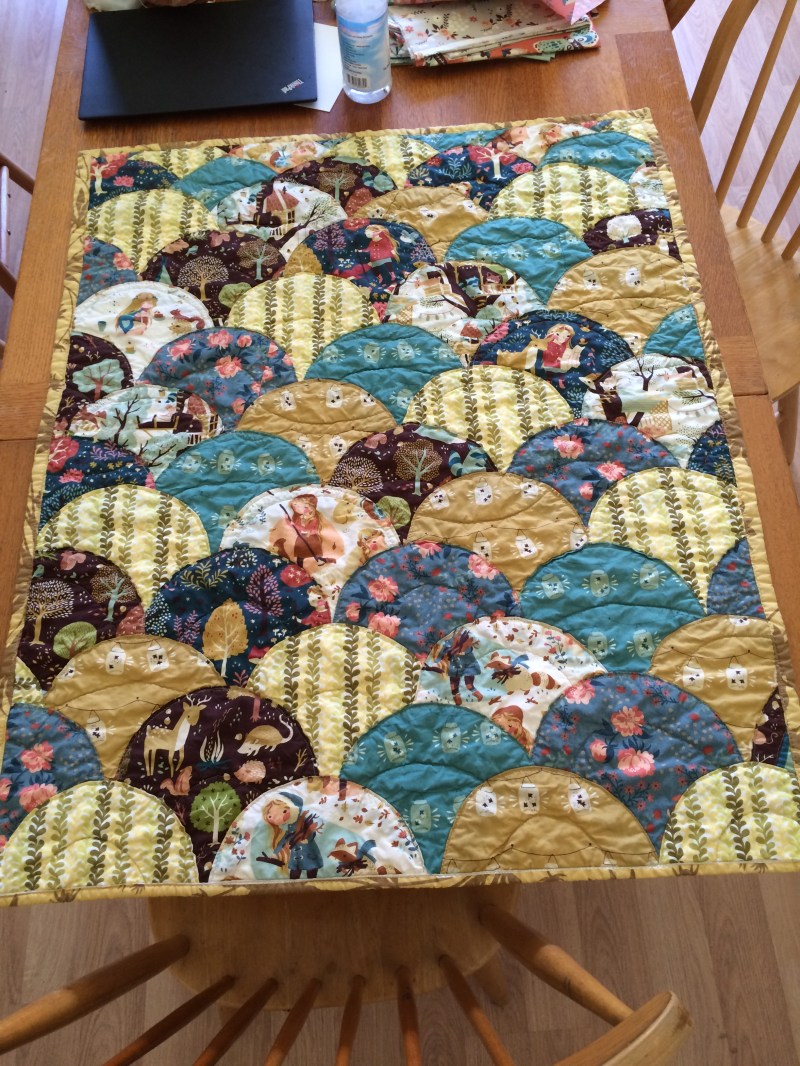
From Eileen – “Here’s one I made in 2014, for a new great nephew. His mom told me she liked woodland animals and when I saw Jaybird Quilts make this using her Chopsticks pattern and a new fabric line for Dear Stella, I decided to totally copy it . Funny thing is I got an early start because baby was due in September. He decided to make his debut late July and I had to literally channel my inner Eleanor Burns and make this “Quilt in a Day”!! Young Alonzo Carter had to stay in the NICU for quite some time and although I could not see him the nurses swaddled him in this quilt every single day and mom regularly sent me updates and pics. Lonzie will be three this year and is thriving and that quilt is his constant companion. He has a sister now too and the same goes for her and her quilt too. This past January, their family was awoken in the middle of a bone chilling cold night by the fire department as their building was on fire. Everyone got out safely and as Alonzo and Elise were sleeping under their quilts, they were saved. Sadly everything else was lost. Thankfully all is well for this family and they are in a new home…
![]()
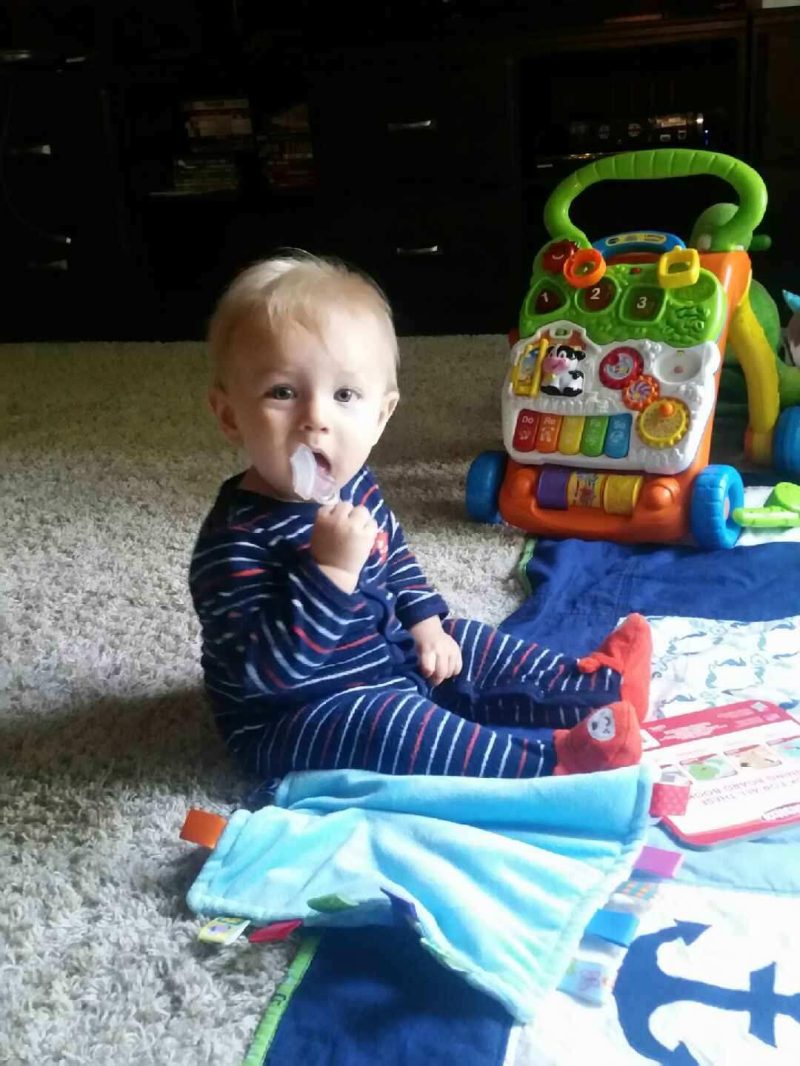
From Brandy: “My most recent baby quilt finish was the Appliquéd Anchor Quilt for my nephew Cullen which was presented at the baby shower held in his honor last January 2016. It included a custom label from Aunt B (me) to enter his birth information. He uses it as a play mat and it makes me happy to see him use it daily! I only wish I could be with him in Ohio to play there together more often!!!”
From Deb L.: “These 2 quilts were for the grandchildren of the woman’s blog I write for. (Brother and sister) The dad was from Kentucky horse country and the baby’s name was Wyatt. The sister, Juniper’s quilt colors were requested by the mom as the color for the nursery and mom loves birds! The cowboy quilt was from a book and the mom saw it before I made it to make sure she liked it. The other one I just made up after I had gather the fabrics in the colors I needed. I also showed her the fabrics to make sure they worked for what she wanted in the nursery.”


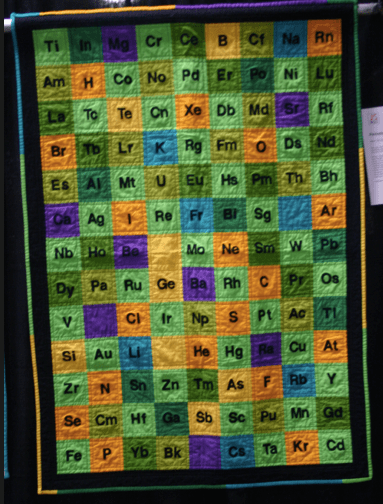
From Deb H: Here are the 2 I’ve made for my grandsons. First… The Periodic Table for my grandson whose daddy is a chemistry teacher. Please note that each of the element ‘families’ have matching backgrounds. Each letter was cut out by hand and then machine appliquéd to the square before being sewn randomly together and quilted. A labor of love!!!
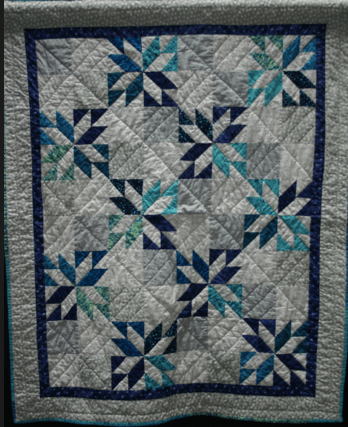
Second… Hunter’s Star was made for my 2nd grandson. I followed the Missouri Star Quilt Company’s tutorial. I chose the pattern because my last name is Hunter. The backing fabric was called Patriotic Star… because his daddy is in the Navy. Next up!!! I’m working on a Clamshell Baby Quilt as my son and daughter-in-law are expecting a little girl in August!!! WooHoo!
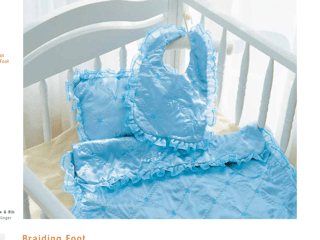
From June M!: This a baby quilt set that I made for our first grandson. I wanted to duplicate one that was my baby quilt using decorative stitches and machine embroidery. I was so proud of the results. It was used in several advertisements during my career at Brother Int’l. I also showed how to make several parts of it on the PBS show Sew Beautiful with Martha Pullen.
March 2017 Show and Tell
Lots of gorgeous work this month – everything from simple and beautful quilts using the rail fence pattern we developed for our “42 Quilts for OG” charity drive to an ornately pieced “Dear Jane” quilt!
Brandy’s star quilt for OG with Bella helping with the basting.
Hopefully the recipient isn’t allergic to dogs…
Eileen’s Split Rail for OG

Michelle also made a beautiful Fence Rail Quilt for OG

June finished up the Split Rail quilt for OG she was working on at our sew-in, using fabric she got from her mother.

Deb L made a quilt for OG with antique style fabrics, inspired by the Victorian homes that line the streets in Ocean Grove.

Sherre used some of the fabric donated by Timeless Treasures Fabrics to make her “Roses” quilt, and quilted it in an all-over rose pattern. She is hoping it can be given to someone named Rose!
")

Phyllis used some more of the fabric donated by Timeless Treasures to make not just one, but two beautiful donation quilts!


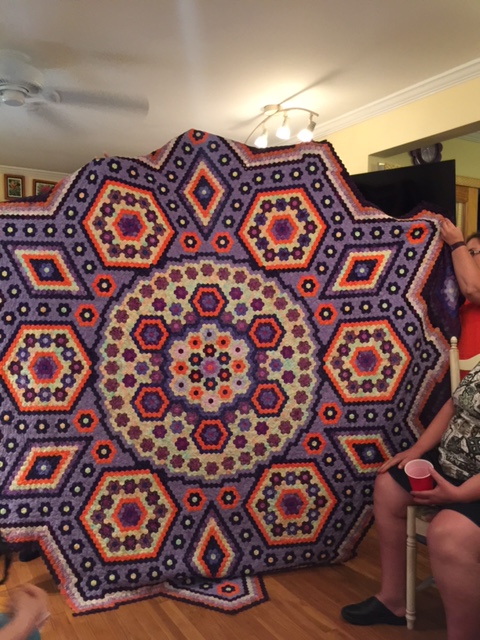
Our visitor Patti showed her Dear Jane quilt which was from a class at Mouse Creek Quilts where she met Michelle! It is all hand sewn and the borders (pictured on the right) still need to be attached.


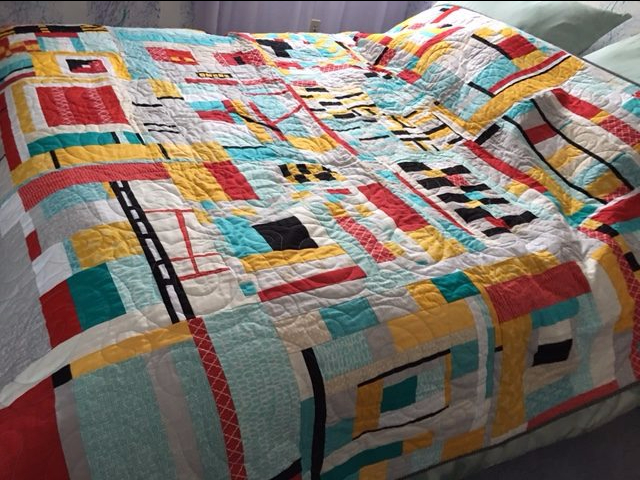
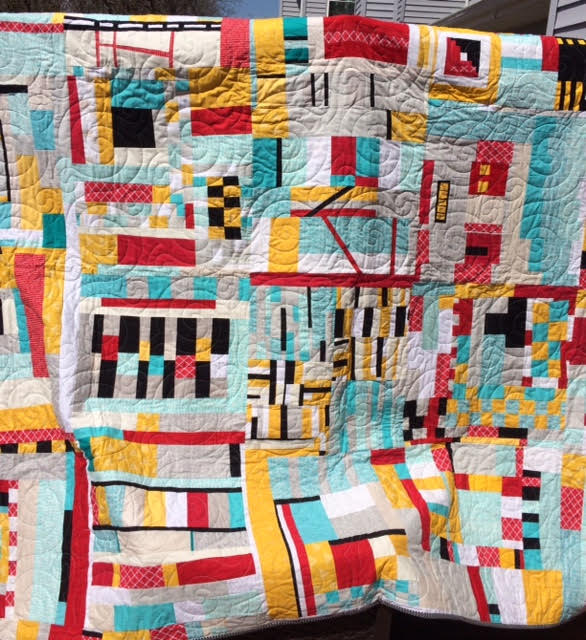
Sherre brought a recent finish – a custom designed quilt using all Tula Pink fabrics – the entire back is pieced from Tula scraps too!
")
")
Sherre also shared another recent finsih – a quilt inspired by Ricky Tim’s “Harmonic Convergence” quilts.

Another great meeting! See you in April!
Valerie Fund Initiative

Maria Dolan, Eileen, Michelle, and a bucket of quilty goodness!
In the words of our own, amazing charity chair, Eileen DiPietro: “Michelle Lewis and I made our much anticipated trip today to the Valerie Center at Monmouth Medical Center in Long Branch with 13 quilts in hand to donate. The Valerie Center is a comprehensive health care center for children with cancer and blood disorders. Their mission is to treat the whole child, socially, emotionally and medically and to do this close to home. The Valerie Fund was founded in 1976 in memory of Valerie Goldstein by her parents who had to travel with her to receive treatment. Today it is the largest network of facilities for children, seeing over 25,000 children per year with seven centers in NJ, NY and PA.
Our meeting today was with Maria Dolan, LCSW, who coordinates the care of these children. Maria gave us a tour of the facility. The atmosphere is cheerful and upbeat. Depending on what the children come in for they could be there for the entire day. There is a waiting room with a huge comfy couch and the walls are lined with bookshelves. Another room is geared toward teens with gaming chairs, video games and iPads. The walls are painted with images of musical instruments. The television room or “Cinema” room has thick, rich, red velvet curtains with gold fringe lining the doorway and televisions with theatre like seating. Even the examination rooms are pleasant and inviting, decorated in beach themes with a surfboards as an exam table!
We had such a pleasant visit with Maria and her staff and they were beyond thrilled to receive the quilts. Maria truly “gets” the whole power of the quilt “thing”. She showed a genuine interest in the process of quilt making and the proper care of the finished quilt. I invited them to come and visit with us at a meeting or sew-in.
The quilts we donated today will be given to children who have to be at the Valerie Center for an extended period of treatment. I asked Maria to let us know when they were running low so we could try and maintain a supply for them. Quilts for kids are such a quick make with a long lasting effect and you ladies are so awesome and generous, and I am always in awe of you. Thank you all!!”

Activty Room at Valerie Center

Cinema Room at Valerie Center

Treatment rooms at Valerie Center
Come Weave with Me!
 Hey all, as promised, here is a primer on incorporating fabric weaving into your quilting, as demonstrated at Quiltfest by yours truly. I discovered fabric weaving, also known as triaxial weaving, mad weave, hex weave, and Japanese meshwork, several years ago and love teaching others how to use this clever and often time-saving technique to create a variety of designs. The technique originates from traditional Japanese fabric manipulation and traditional basket weaving, and while more commonly taught in areas closer to Asia – Australia, New Zealand, and the West Coast of the US, it began to pick up in popularity again here on the East coast in early 2012. As with all things quilting, what was old is always new again- this technique was popular in the US among quilters and sewists in the 1970’s. Note: Most of the samples in this tutorial use grosgrain ribbon – an excellent way to become familiar with the process before you cut into your much-loved fabrics. This technique can be used to make individual quilt blocks, panels for purses and clothing, or entire quilts.

What you’ll need: Prepared strips (see details on prep below), Foamcore/thick cardboard as large as your finished piece, Straight pins or thumbtacks, and a large safety pin or other make-do device for pulling fabric strips into place – early on in my weaving journey, my friend Tara started 3-D printing a tool specially designed to weave fabric strips, the amazing Wefty needle. She makes them in several different sizes and they make this whole process a dream! I highly recommend picking a few up if you find yourself intrigued with fabric weaving.
Strip Preparation: Prep your strips – it’s important to remember that you will need approximately 3 times as much fabric as you would for a traditional quilt since there are three layers to any woven design. For the tumbling blocks weave, you will need 1.25 times as much fabric as your final quilted area in EACH of your three weave colors. This is assuming you are cutting 2.5″ strips and running them through a 2.5″ bias tape maker, resulting in 2″ finished strips. I usually cut 2.5 strips on the grain of the fabric (jelly rolls work wonderfully for this), WOF, and starch and press on high heat as I run them through my bias tape maker, then starch and press on high heat. I cut my prepared strips to the right lenght, and piece the “leftovers” together – if you don’t want to fuss with this, you could cut all strips to the right length before preparing. Actually cutting strips on the bias is not recommended – you don’t want your strips to be too stretchy, as this can distort your weave. There are several other ways to make and finish strips, depending on the time you want to invest on the “front end” of your project and its ultimate use. We’ll save that for another tutorial though 🙂
1. For your first layer, you will be cutting strips the finished height of your piece, plus an extra inch to allow for adjustments. You will need enough strips to cover your entire base – how many strips you will use depend on the width of your strips and the width you want your finished piece to be.
2. Prepare your surface. You will need a surface large enough for your finished piece or block – my favorite easily accesible material is foam core board from craft stores. If you buy two trifold boards and connect them with duct tape you can create quite a large surface. For even bigger pieces, sheets of lightweight drywall from a home improvement store works wonderfully. You can adhere your strips with thumb tacks or straight pins, inserted into the foamcore at a 45 degree angle.
 3. Lay down your first layer. The sequence of colors you use in this first layer will dictate your final design – for this example, which creates a tumbling block design, you are going to use color 1 (solid blue) as your base. Make sure your strips are stretched tight and are lined up as straight and close together as possible. For any other fellow weavers out there, this is, in essence, your warp.
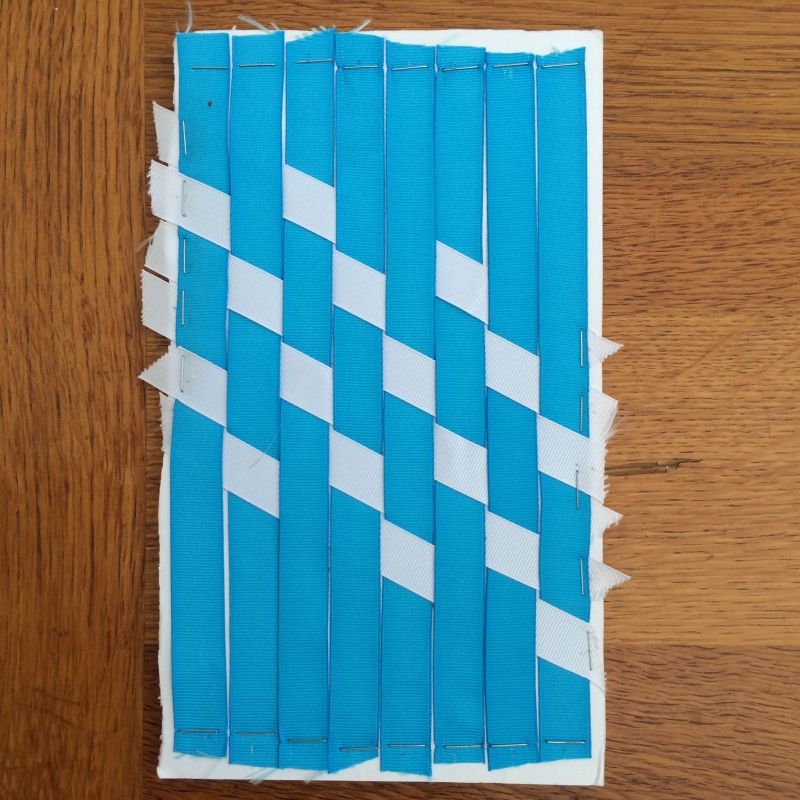 2. Next, use a ruler to mark a 45 degree angle across your entire piece from the upper left to the lower right side – I like to use painters tape for this, as you will only need it as a guide for the first few strips – after you have pinned your first couple in place, remove the tape and simply use the beginning of your second layer as a guide. Use your 45 degree line to place your first strip of color #2 (white in this example). Your pattern here is basically “two under one over” – that is, strip 1 will go under your first two blue strips, over your third, then under the next two. The next strip will use the same pattern, but shift over one space, so over the first blue strip, then under the next two. The third will be similarly shifted, this time under one, over one, under two. I know this can sound overwhelming, but zoom in on the example above, and remember, nothing is sewn down yet! My mantra when I do this weave is “under two, over one, under one” – the first step every strip in the sequence takes.
As you weave in each strip, make sure to anchor your starting end with a pin or thumbtack so you don’t just pull it out the other side. When you have completed your second layer, step back and look at your piece – you should have rows of diamonds in color 2 running from the top left corner to the bottom right. At this point, unpin and reweave any strips that were placed incorrectly. Once this is done, make sure all of your second layer strips are securely pinned down. At this point you may need to tighten up and straighten your first layer as well.
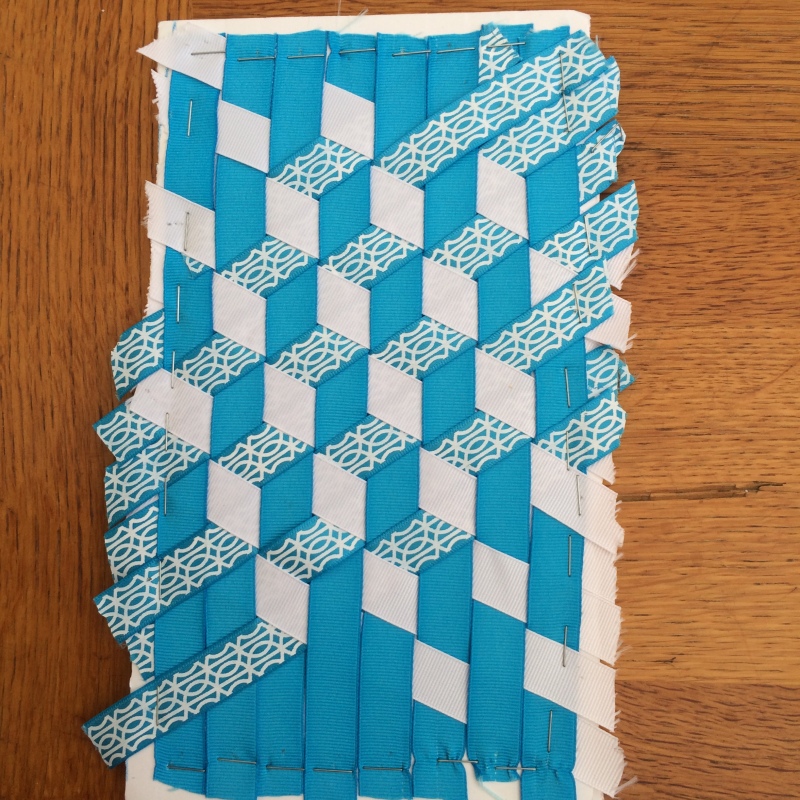 3. Just as in step 2, mark a 45 degree angle with painters tape, this time from upper right to lower left. You are going to repeat the same pattern, taking strips of color 3 (blue and white patterned ribbon) and running them over one, under two of your previous two layers, staggering your sequence as you did in step 2. Think about it in terms of just your first layer – you are still using an over one, under two pattern, but are also going under any overlaying strips from layer 2. A picture is worth well more then 1000 words in this case, zoom in and take it one strip at a time. This may take a few tries to do correctly – I still lose track of my pattern sometimes. Look for a pattern of color 1 diamonds emerging, moving from the top right corner to the bottom left this time. Once you have finished this layer, adjust and tighten as before. You may need to tighten and adjust color 1 or 2 strips as well – look for any slack and adjust as neccessary.
4. The last step – stabilizing – is a little nerve wracking, especially with a large weave, but just take your time and you’ll be fine. I like to put painters tape down over my whole weave as a precaution first. Then, I remove my pins, and gently slide my piece off the foam board. For extra security, you can take white school glue such as Elmers or Roxanne’s and place a dot at each intersection of the weave, then press to dry the glue. After securing my strips in place, I use my domestic machine to zigzap all four sides of my weave. At this point, if you are not going to baste the piece to batting and backing immediately, it can be stored taped or pinned against a hard flat surface such as cardboard or foamboard – I like to tape mine down to rigid cardboard and hang them on pants hangers till I am ready to use them, but they can certainly be stored flat as well (I have a few hidden under my bed) .
If your strips were simply ironed after running them through a bias tape maker, your quilt will need to be thoroughly quilted in the ditch of each “diamond” shape so that it does not distort or unravel in the washing machine. Other strip preparation methods will allow you to do less dense quilting – watch this site for more info on that.
Please leave any questions or comments below, and feel free to contact me with any weaving specific questions at my personal email, silverforgefarm (at) gmail (dot) com with any inquiries.
Resources – Many of the books on fabric weaving are out of print, but readily available used on Amazon. Also don’t be afraid to buy books that are not translated – the diagrams are really what matters in triaxial weaving designs, and most of them are quite easy to understand, even if the text is only in Japanese.


43 Quilts for OG Sew-In is TODAY! Join Us!
We welcome all helping hands – even if you don’t sew, we can use help with cutting, ironing, and pinning during the quilting process. Irons, Cutting Table, and Ironing Board provided. We have also designed a simple rail quilt pattern and will have the supplies available to create it today at the sew in!
